Backups
Files
A full Bee node backup includes the keys, localstore, statestore, and password files. The node should be stopped before taking a backup and not restarted until restoring the node from the backup to prevent the node from getting out of sync with the network.
Node key and state data is found in the data directory specified in its configuration.
Key data in backup files allows access to Bee node's Gnosis account. If lost or stolen it could lead to the loss of all assets in that account. Multiple backups should be kept in secure locations.
Don't forget - it's not a backup until you're sure the backup files work! Make sure to test restoring from backup files to prevent loss of assets due to data loss or corruption.
Ubuntu / Debian / Raspbian / CentOS package managers
For Linux installations from package managers yum or apt, the data directory is located at:
/var/lib/bee
It may also be useful to include the bee.yaml config file in a backup so that configuration can be easily restored. The default location of the config file is:
/etc/bee
Binary package install
If you installed Bee using the automated shell script or by building Bee from source, your data directory will typically be located at:
/home/<user>/.bee
Docker Compose
When using Docker Compose configuration files to run a node, Docker will create a volume for Bee.
Use docker cp to retrieve the contents of these folders:
docker cp bee_bee_1:/home/bee/.bee/ bee
Data types
The data directory contains three directories. Its default location depends on the node install method used.
Shell script install:
/home/<user>/.bee
├── keys
│   ├── libp2p.key
│   ├── pss.key
│   └── swarm.key
├── localstore
│   └── ...
└── statestore
    └── ...
Package manager install:
/var/lib/bee
├── keys
│   ├── libp2p.key
│   ├── pss.key
│   └── swarm.key
├── localstore
│   └── ...
└── statestore
    └── ...
Keys
The keys directory contains three key files: libp2p_v2.key, pss.key, and swarm.key. These keys are generated during the Bee node's initialisation and are the most important data to retain for a backup.
The swarm.key file allows access to Bee node's Gnosis account. If the key is lost or stolen it could lead to the loss of all assets secured by that key. Multiple backups should be kept in secure locations to prevent loss of assets or unauthorized access.
To use swarm.key to manage the Gnosis account for a node through Metamask or other wallets, exportSwarmKeys can be used to convert swarm.key to a compatible format.
Statestore
The statestore directory retains information related to the node,
including SWAP balances, info on peers, block list, postage stamps, and more.
As the data in statestore and localstore continually changes during normal operation of a node, when taking a backup the node should first be stopped and not re-connected to the Swarm network until restoring from the backup (otherwise the statestore and localstore files will get out of sync with the network). It is possible to restore using out of sync statestore and localstore files, however it may lead to data loss or unexpected behavior related to chunk uploads, postage stamps, and more.
Localstore
The localstore directory contains chunks locally which are frequently requested, pinned in the node, or are in the node's neighbourhood of responsibility.
Backup Your node
Copy entire bee data folder to fully backup node. This will do a full backup of statestore. localstore, and key files into the newly created /backup directory. Make sure to save the backup directory to a safe location.
mkdir backup
sudo cp -r /var/lib/bee/ backup
Export keys
If you only need to export your node's blockchain keys, you need to export the swarm.key UTC / JSON keystore file and the password file used to encrypt it. First create a directory for your keys and then export, make sure to save the newly created keystore directory in a safe location.
mkdir keystore
sudo cp -r /var/lib/bee/keys/swarm.key /var/lib/bee/password keystore
View key and password for wallet import
sudo cat /var/lib/bee/keys/swarm.key
sudo cat /var/lib/bee/password
Note that swarm.key is in UTC / JSON keystores format and is encrypted by default by your password file inside the /bee directory. Make sure to export both the swarm.key file and the password file in order to secure your wallet. If you need your private key exported from the keystore file, you may use one of a variety of Ethereum wallets which support exporting private keys from UTC files (such as Metamask, however we offer no guarantees for any software, make sure you trust it completely before using it).
Metamask Import
If you wish to import your blockchain account to a wallet such as Metamask, you can simply print out your keystore file and password and use those data to import into the wallet:
Get private key from keystore and password
To import to Metamask:
- Get your
swarm.keyandpasswordas described in the section above. - Go to Metamask and click "Account 1" --> "Import Account"
- Choose the "Select Type" dropdown menu and choose "JSON file"
- Paste the password (Make sure to do this first)
- Upload exported JSON file
- Click "Import"
To export your private key:
- Go to Metamask and click "Account 1" to view the dropdown menu of all accounts
- Click the three dots next to the account you want to export
- Click "Account details"
- Click "Show private key"
- Enter your Metamask password (not your keystore password)
- Copy your private key to a safe location
Restore from backup
Before restoring, make sure to check for any old node data at /var/lib/bee from a previous node which has not yet been backed up, and back it up if needed.
Install Bee. See install page for more info.
Change ownership of
beedata folder.sudo chown -R /var/lib/beeDelete statestore, keys, localstore, and password files.
sudo rm -r /var/lib/beeNavigate to backup directory and copy files to data folder.
cp -r /<path-to-backup>/bee /var/lib/Revert ownership of the data folder.
sudo chown -R bee:bee /var/lib/beeStart
beeservice and check logs to see if Bee node is running properly.sudo systemctl restart bee
sudo journalctl --lines=100 --follow --unit bee
Import Clef Keys
Bee Clef is the deprecated external signer for Bee. Node operators are recommended to remove Clef from their setup in order to ensure their nodes continue to operate smoothly through future updates. Below is a guide for importing Clef keys into a non-Clef setup. See the #node-operators Discord channel for more support from other node operators and channel admins.
Step 1: From /bee-clef directory, print out keystore and password and keystore and save for the next step:
Notice: You may need to sudo chown -R user:user /bee-clef if you do not already have access
This is a throwaway account so we are sharing the keystore and password for this guide, never share your keystore or password like this!
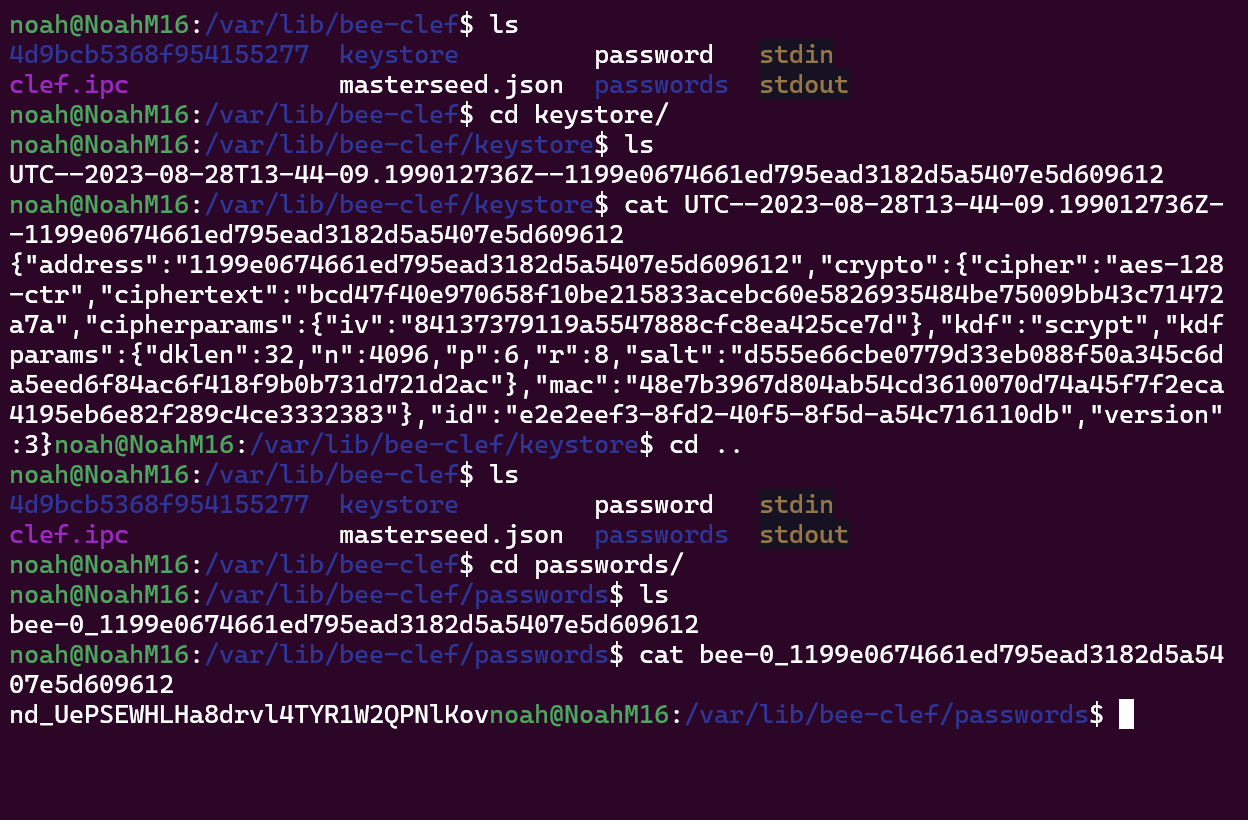
Follow the steps shown in the screenshot above to print out clef keystore.
Keystore (throwaway example):
Copy the output shown in the screenshot:
{"address":"1199e0674661ed795ead3182d5a5407e5d609612","crypto":{"cipher":"aes-128-ctr","ciphertext":"bcd47f40e970658f10be215833acebc60e5826935484be75009bb43c71472a7a","cipherparams":{"iv":"84137379119a5547888cfc8ea425ce7d"},"kdf":"scrypt","kdfparams":{"dklen":32,"n":4096,"p":6,"r":8,"salt":"d555e66cbe0779d33eb088f50a345c6da5eed6f84ac6f418f9b0b731d721d2ac"},"mac":"48e7b3967d804ab54cd3610070d74a45f7f2eca4195eb6e82f289c4ce3332383"},"id":"e2e2eef3-8fd2-40f5-8f5d-a54c716110db","version":3}
Password
Again copy the output, make sure you are printing the password file in /passwords whose title matches the address of the account you are exporting (i.e., after the bee-0_ portion of the password file name the address of the wallet is printed starting with 1199e... )
nd_UePSEWHLHa8drvl4TYR1W2QPNlKov
Step 2: Import Clef Keys
Check your settings
Make sure you have removed clef related entries from your settings, such as clef-signer-enable and clef-signer-endpoint
Import keys
Navigate to your bee install location. For our example it is installed at the default /var/lib/bee:
Notice: You may need to sudo chown -R user:user /bee if you do not already have access
From here you may have accounts here which you have not yet backed up. As the following steps to import your bee-clef keys will erase any keys you have currently, make sure to backup any keys you already have here.
Import password
From /var/lib/bee open your password file using vi and overwrite it with the password you copied from step 1, and save the changes. (Make sure you have the original password backed up if you want to save the account already there.)
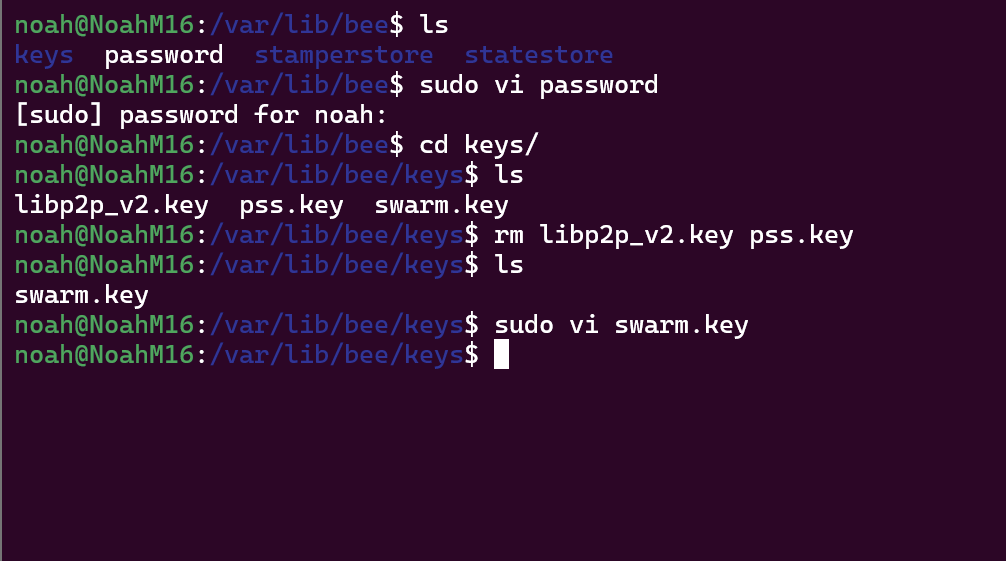
Import keystore
First navigate to /var/lib/bee/keys and delete the libp2p_v2.key and pss.key files using rm libp2p_v2.key pss.key.
Next, open the swarm.key file using vi and paste the keystore you copied from the first step, then save and close the file.
Finally, give permissions back to bee with:
sudo chown -R bee:bee /bee
Now your import is complete, simply restart your bee to allow it to regenerate your pss.key and libp2p_v2.key files